By Xperian
Website Elements of Carrd
Learn how Carrd's elements work in with the help of these staged scenarios.
Made by Nocoloco for Carrd Product Intensive (CPI)
Choose an element to explore
Accept Payments in Carrd.
There are 3 options to accept payments in Carrd.
Option 1
Widgets
The Widget element allows you to embed pre-made widgets. The pre-made widgets which you can use for payment are:
Gumroad
Stripe
Paypal
Step 1: Add an Widget
Step 2: Choose the Widget


Test: Stripe Widget
Test: Gumroad Widget
Option 2
Embed Code
If you want to use other payment providers like Razorpay from India 🇮🇳 or Paystack from Nigeria 🇳🇬 or even Buy me a Coffee. Using the embed button feature is your best bet.
Step 1: Add an Code
Step 2: Add an Inline Code for Payments.


Test: Razorpay Button
Other Payment Embed Options
Buy Me a Coffee Widget
Payhip (Best for Europe)
Tillypay
Podia Course Buttons & many more!
Option 3
Payment Forms
If you want to charge your customers based on form responses, then this your best option. Works only with Stripe.
Step 1: Add a Form
Step 2: Choose Require Payments on Submit.
Test the Payment flow below ↓
All payments are done via Stripe Test Accounts. See how to test the payment widget:
Fill in your email
Then use card number
4242424242424242, a valid expiration date in the future, any random CVC number and a random card holder name on the payment page.Click the button and to create a successful test payment.
You will be redirected to a page on payment successfully made.
Test: Pre-Configured Stripe Payment
Test: Variable Stripe Payment
Pricing Tables
Show Comparitive pricing options to your users.
Pre-Order 50% off Price.
$ 24.99
Lifetime Access to Course.
4 Hours of Recorded Tutorials.
6 Case Studies which help you ship websites.
25+ Carrd Resources.
5 Mini Guides on using Carrd.
20% of Carrd Subscription.
Pre-Order 50% off Price.
$ 99.99/year
Lifetime Access to Course.
4 Hours of Recorded Tutorials.
6 Case Studies which help you ship websites.
25+ Carrd Resources.
5 Mini Guides on using Carrd.
20% of Carrd Subscription.
Pre-Order 50% off Price.
$ 24.99/month
Lifetime Access to Course.
4 Hours of Recorded Tutorials.
20% of Carrd Subscription.
✅ Reccomended Plan
$ 10.99/month
4 Hours of Recorded Tutorials only.
Pre-Order 50% off Price.
$ 24.99/month
Lifetime Access to Course.
4 Hours of Recorded Tutorials.
20% of Carrd Subscription.
Pre-Order 50% off Price.
$ 99.99/year
Lifetime Access to Course.
4 Hours of Recorded Tutorials.
6 Case Studies which help you ship websites.
25+ Carrd Resources.
5 Mini Guides on using Carrd.
20% of Carrd Subscription.
Forms
Forms are made for various contexts as below.
Send data to Google Sheets
This form option allows you to store user information into your google sheets via Airtable Automations.
🚨You must understand code to use zapier forms. Airtable Automations works best for No-Coders!
Step 1: Add an Form
Step 2: Choose Custom Form > Send to Airtable
Substack Embed
This option allows you to accept subscribers direclty into substack or similar.
Step 1: Add an Embed
Step 2: Customise code.
Subscribe to our newsletter ↓
Airtable Forms
This form option allows you to store user information into your airtable databse.
Step 1: Add an Form
Step 2: Choose Custom Form > Send to Airtable
Contact Forms
This form element allows your users to contact you directly. Make it easy for your customers to contact you for leads, etc. You can also accept:
Images / Attachments
Options to contact & more...
Step 1: Add an Form
Step 2: Choose Contact Form
Frequently Asked Questions in Carrd
Here's a quick guide for you to add FAQs to your website.
Simple Native Layout
This option allows you add a FAQ to your website. Scales well upto 5 questions.
Step 1: Add Text with Size: 1.25
Step 2: Add Text with Size: 1
Step 3: Add a Divider.
A frequently asked Question?
Lorem ipsum dolor sit amet, consectetur adipiscing elit, sed do eiusmod tempor incididunt ut labore et dolore magna aliqua. Ut enim ad minim veniam, quis nostrud exercitation ullamco laboris nisi ut aliquip ex ea commodo consequat.
A frequently asked Question ?
Lorem ipsum dolor sit amet, consectetur adipiscing elit, sed do eiusmod tempor incididunt ut labore et dolore magna aliqua. Ut enim ad minim veniam, quis nostrud exercitation ullamco laboris nisi ut aliquip ex ea commodo consequat.
A frequently asked Question ?
Lorem ipsum dolor sit amet, consectetur adipiscing elit, sed do eiusmod tempor incididunt ut labore et dolore magna aliqua. Ut enim ad minim veniam, quis nostrud exercitation ullamco laboris nisi ut aliquip ex ea commodo consequat.
With HTML & CSS
This option allows you add a FAQ to your website with CSS.
Step 1: Get the code from the course.
Step 2: Add Embed Block.
Step 3: Edit Text as required.
What is this product?
Lorem ipsum dolor sit amet, eu alia suscipit mei. Reque iriure delectus vix id, ex sed forensibus suscipiantur. In eos exerci mollis apeirian, an qui latine alienum. Ad mea libris maluisset, consul assueverit sea ex.
Why should you get this?
Lorem ipsum dolor sit amet, eu alia suscipit mei. Reque iriure delectus vix id, ex sed forensibus suscipiantur. In eos exerci mollis apeirian, an qui latine alienum. Ad mea libris maluisset, consul assueverit sea ex.
What is the pricing?
Lorem ipsum dolor sit amet, eu alia suscipit mei. Reque iriure delectus vix id, ex sed forensibus suscipiantur. In eos exerci mollis apeirian, an qui latine alienum. Ad mea libris maluisset, consul assueverit sea ex.
What kind of browsers does it work on?
Lorem ipsum dolor sit amet, eu alia suscipit mei. Reque iriure delectus vix id, ex sed forensibus suscipiantur. In eos exerci mollis apeirian, an qui latine alienum. Ad mea libris maluisset, consul assueverit sea ex.
Via Awesome Table
This option allows you add a FAQ to your website with embed code.
Step 1: Get the code from Awesome Table.
Step 2: Add Embed Block.
Track goals & events in Carrd
Here's a quick guide for you to add tracking goals in Carrd.
Track Events
This option allows you track clicks and events via buttons or links using Google Analytics code.
Step 1: Add an Button
Step 2: Add code to Button/ Form under "On Submit or On Success parts."
Add this code
gtag('event', 'action', {'event_category': 'category', 'event_label': 'label'});
Slideshow & Tickers
Create a easy way to show pictures or clients using Carrd's Slideshow element.
Photo Gallery
This option allows you add a photo gallery to your website.
Step 1: Add an Slideshow
Step 2: Add photos and adjust speed as necessary.
Crossfade
Fade
Instant
Tickers
This option allows you to add a Ticker to your website.
Step 1: Add an Slideshow
Step 2: Add image.
Step 3: Select Motion Style & Speed.
Client Logos
Deal Ticker
Scalable & Filterable Database
Using an embed this database is possible. Checkout this Demo and tutorial on Podia.
Testimonials
Make testimonials in Carrd & show off proof of work and in your websites.
Image Testimonials
Add Images & make it a slideshow to show many testimonials.
Step 1: Add an Slideshow
Step 2: Add image.
Step 3: Select Motion Style & Speed.
Crossfade Setting in Slideshow
Instant Setting in Slideshow
Image & Text Testimonials
Add text & image combinations to make a testimonial.
This product changed my life and i just want to say thank you!!
James Blank, Mango-Feed.


Gallery Testimonials
Add Images & make it a gallery to show many testimonials.
Step 1: Add an gallery
Step 2: Add images
Step 3: adjust height and align them


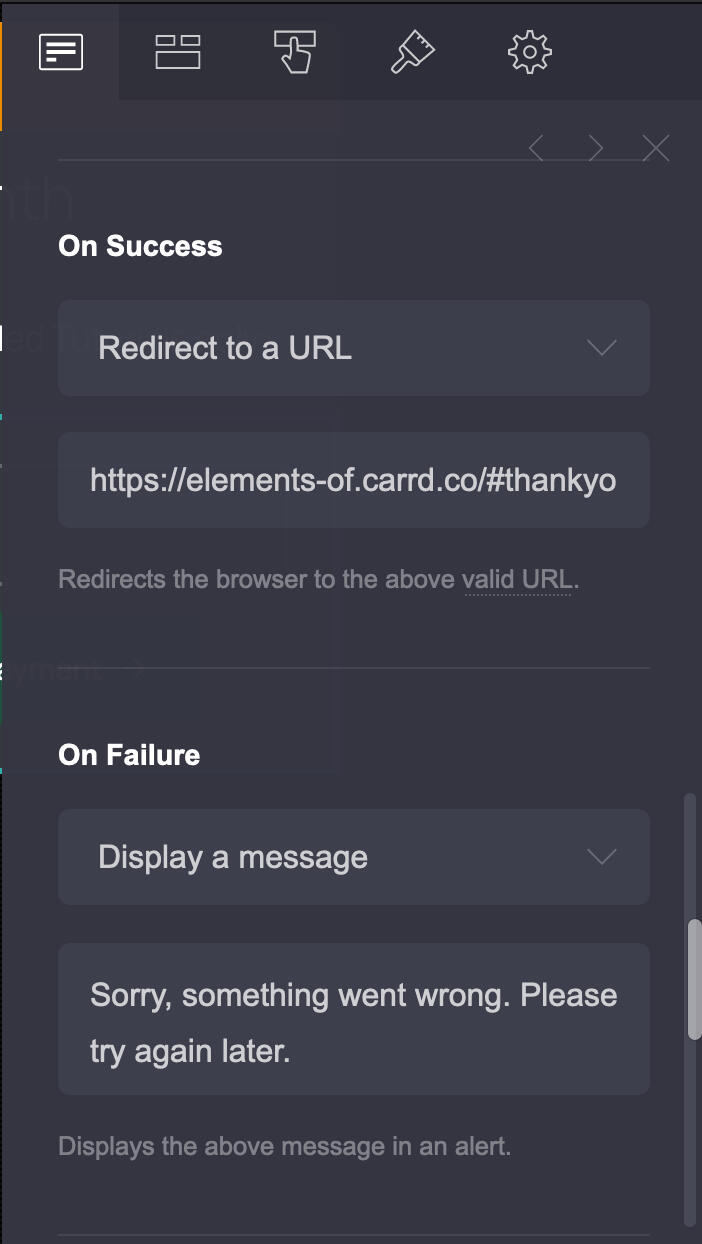
Success! Your Payment went through.
Testing of the payment via any payment method is successful and it loaded a thank you page. On Success, you can also use the URL field for sharing the following:
Share digital assets via email.
Share confirmation pages.
Share calendar booking time slots (via Calendly or similar)
Share event calendars.
DO NOT do the following:
Testing of the payment via any payment method is successful and it loaded a thank you page. On Success, you can also use the URL field for sharing the following:
Share Final assets which are made via payments only.
Share custom content.
Share sensitive documents.